WebDaddy Pro allows customers to provide other people with access to their accounts without sharing their personal login credentials. This is useful when a business owner needs to give an employee, accountant, developer, or agency permission to help manage specific services.
Account access is organized around two important concepts: users and client profiles. Understanding the difference helps you manage multiple businesses, control who can access your services, and keep account information organized.
1. Understand Users and Client Profiles
WebDaddy Pro separates the person who signs in from the client profile that owns the services.
Client Profiles
A client profile represents an individual or business account. It is the account associated with its own products, services, billing information, and support activity.
For example, you might maintain separate profiles for:
-
Your personal services.
-
Your business.
-
A second business you own.
-
Another organization you are authorized to manage.
Each profile remains separate, with its own services and account information.
Users
A user is the individual login identity used to access WebDaddy Pro.
One user can be associated with multiple client profiles. The user signs in with their own credentials and accesses the profiles for which they have been authorized.
This means you do not need a different username and password for every profile you manage.
Profile Owners
Each client profile has one designated owner. The profile owner has full profile-management authority, including the ability to invite users and manage their permissions.
When a new profile is created, the user who creates it becomes its owner. If a new customer profile is established during checkout, the logged-in user creating that profile becomes its owner.
The profile owner can then authorize other users to access the profile.
2. Invite Another User to Your Profile
Profile owners can invite additional users through the Profile Management area of the Client Dashboard.
To invite someone:
-
Sign in to your WebDaddy Pro Client Area.
-
Open the Hello, [Name]! menu.
-
Select Profile Management.
-
Find the user-management or invitation area.
-
Choose the option to invite or add a user.
-
Enter the email address to which the invitation should be sent.
-
Select the permissions the invited user should receive, where available.
-
Send the invitation.
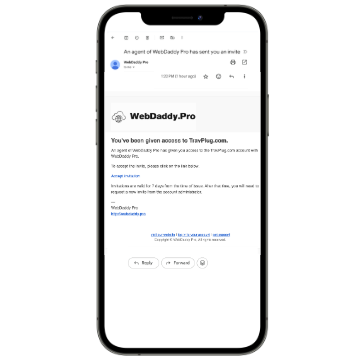
The invited person will receive an email containing a link to accept the invitation.
Important: Invitations expire after seven days. The recipient must accept the invitation before the link expires. If it expires, the profile owner will need to send another invitation.
3. What Happens When Someone Accepts an Invitation?
The invitation process connects a user to a client profile. It does not transfer ownership of the profile or its services.
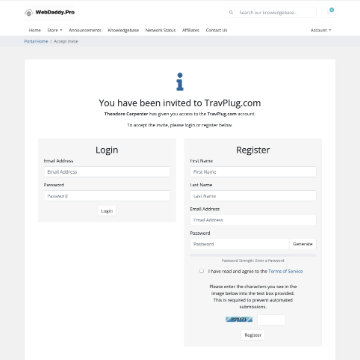
If the invitation is sent to an email address already associated with a WebDaddy Pro user account, the recipient can sign in using their existing credentials and complete the acceptance process.
If the recipient does not already have a user account, they can create one during the process.
The invitation is sent to a specific email address, but the email address used for the user's login identity during acceptance may differ. Accepting an invitation should not be confused with verifying the email address associated with a profile or user account.
Only accept invitations you recognize and expect. If you receive an unexpected invitation, verify its origin before proceeding.
Invitation example
View the WebDaddy Pro invitation example
4. Manage Users in Profile Management
The Profile Management area is where a profile owner can review the users associated with a profile and manage their access.
To manage an existing user's access:
-
Sign in to the Client Area.
-
Open Hello, [Name]! → Profile Management.
-
Locate the user whose access you want to change.
-
Open the user's permission-management options.
-
Review the permissions currently assigned.
-
Make the necessary changes.
-
Select Save Changes.
View the user invitation and management screen
Changes to a user's permissions determine what that user can do within the selected profile. They do not make that person the profile owner.
5. Understand How Multiple Profiles Work
A single WebDaddy Pro user can be associated with more than one client profile.
For example, a consultant might have access to:
-
Their personal profile.
-
Their own consulting business.
-
A separate company they help administer.
-
A client profile where the client has granted them access.
Each profile remains independent. Access to one profile does not automatically provide access to another.
When a user signs in:
-
One associated profile: The session opens directly into that profile.
-
Multiple associated profiles: The user is presented with a profile-selection screen and must select the profile they want to access.
After signing in, users can switch between authorized profiles without signing out.
See How to Switch Between Multiple WebDaddy Pro Accounts for detailed instructions.
6. Give Each User Only the Access They Need
Not everyone who helps manage your business needs access to every account function.
Consider the responsibilities of each person before granting permissions:
-
Accountant: May need access to invoices, billing information, and payment-related functions.
-
Developer: May need access to hosting settings, website files, or technical functions.
-
Employee: May need access to selected services or account information.
-
Agency or consultant: May need permission to perform specific tasks on your behalf.
Use the principle of least privilege: grant only the permissions necessary for the person's responsibilities.
Avoid giving full administrative access when a more limited permission set is sufficient.
For additional information, see WebDaddy Pro User Roles and Permissions Explained.
Watch: Managing Client Access Safely
Managing Client Access Safely: Custom Permissions for Agency Teams | WebDaddy Pro Partners
7. Keep Your Account Secure
Follow these practices when providing access to other people:
-
Do not share your personal login credentials.
-
Invite each person using their own user account.
-
Grant only the permissions they need.
-
Review access when an employee, contractor, or agency relationship changes.
-
Remove access when someone no longer needs it.
-
Keep your own account email and recovery information current.
-
Review unexpected invitations before accepting them.
Giving someone permission to access a profile does not require giving them ownership of that profile.
Manage Account Access with Confidence
WebDaddy Pro's user and profile structure allows individuals and businesses to organize their services while authorizing other people to help manage them.
By keeping profiles separate, using individual user logins, and assigning permissions carefully, you can collaborate with employees, accountants, developers, and agencies without sharing your personal credentials.
If you need help with invitations, profile access, or account permissions, contact WebDaddy Pro Support.